DIY Sliding Barn Door

Sunday, September 29, 2013

Pinterest pinterest, pinterest oh how I love you!!!! After seeing all these amazing ideas I knew that I had to put a few to the test. This diy project took a little pondering and planing but the end result is amazing.....

Our sliding barn door tutorial :) :) :)

The wood that we used for ours came from The Outlaw's brother. It was previously used as crate cribbing on stuff at his work and sat outside for a few months so it was nice and weathered, and free! 
I've seen the exact same cedar wood boards at Lowe's for about $10 a piece, not as attractive as FREE, but if you can't find it, there you go.


Make sure you bring the wood inside, at least a couple days, in advance to acclimatize if you want  tight gaps between the boards.


 We started by making a sketch of what we wanted it to look like. We had an idea but until we laid out the wood we were not sure. 


The boards were a variety of lengths. Instead of measuring each board separately we lined the top edges up and marked one board to length. Then using a square and straight edge marked the rest and cut each on a miter saw.


Using a couple ratchet straps, we squeezed the boards tightly together. Lying the horizontal boards across the vertical and putting your weight on it with a knee will keep the vertical boards flat and buckling inward as you tighten the straps.


Keeping the screws lined up and not random makes it look a little more organized. After this we screwed on all of our horizontal pieces (which we cut to the same measurement as the vertical pieces were wide combined) with 1 1/2" wood screws. After this was done we flipped the door over and screwed threw the vertical into the horizontal pieces. We did this for a better hold and to ensure that the screws would not stick out either side.


For the roller hardware we used a  12'' x 1 1/8" mending plate (TSC) that cost 3.99 each and attached 3"steel garage door pulleys to the plates with the supplied bolts from the pulley kit. I think it cost something like 4.49 for the kit. We placed brackets where we wanted them marked holes and drilled them out for attaching the mending plates.


Again, you don't want anything sticking through to catch on anything, so we used some T nuts on the back side of the door to attach the mending plates. And that was it for the door construction. 
Next we had to figure out how to mount a rail for the pulleys to slide on...


We picked up some steel flat stock in the welding department at TSC measuring 11/2"x1/8"x72" for about $8.00. We marked the center of the stock and then marked out every 12" to the ends and drilled a 3/8" hole at each mark. (We had a heavy duty wood slat wall to mount our stock, you may need to find the studs and then drill holes to that criteria)


We held the stock where we wanted it, level of course, and marked each hole. With a 5/16" drill bit we drilled at each mark. Then we used 3/8"x 3 1/2" lag screws, with nuts that slid over the screws as spacers, and hung the steel stock. Depending on how thick the wood is, trim and other factors you may need more or less than our 5 spacer nuts.


 Somewhere along the line we picked up these small L brackets with something and always seem to have leftover parts... They worked perfect as stops attached on each end of the steel stock.


Finally we lifted the door and hung it on the steel stock.


As you can see the finished product looks different than the sketch. We toyed around with a horizontal bored across the middle and a cross member from corner to corner but settled on the simple design with the arch accent we cut in with a jig saw. You can get fancy and put whatever design you could think of and cut it out, but there's just something in simplicity.


“Simplicity is the ultimate sophistication.”
― Leonardo da Vinci

* All  of our nuts and bolts and odds and ends came from Tractor Supply Company. I don't know if they are all the same, but ours charges by the pound for nuts and bolts instead of by item like most hardware stores and saved us a bundle.


Flannel Rhinestones and Studs OH MY!!!

Thursday, September 26, 2013

This may be one of my all time favorite outfits!!! I saw this shirt and it was love at first site. It is me and my personality 100% the shirt is from Love Culture the pants from Target many many moons ago and shoes Kmart of all places a long time ago. Hope you all love it as much as I do :)


Watch is Michael Kors a gift from the cowboy
and my bracelet is Kenneth Cole 


P.S. For all you 80's babies out there my pants are tight rolled....love it


XoXo


Leopard and a bow

Wednesday, September 25, 2013

Wednesday outfit. Sweater from Target jeans from JCPenny and shoes from Meijer. My watch is fromKohl's belt Target and necklace Love Culture 


Have a great day guys. 


Turns out I'm so dutch that..........

Well as you know I'm dutch.....as in blond hair blue eyed dutch but my heritage is also dutch. So what I've learned from my parents is that you never throw anything away. And if it isn't broke you don't fix it. When I bought my house there was this god awful refrigerator and it still worked so of course I couldn't just get a new one. But I could give it a face lift!!!!


I cleaned all the grim and dirt off  this super ugly refrigerator and removed the handles.


I used a metal primer and a black metal paint from Lowes. 
It cost about $15 if I remember right...
Oh and a can of sliver spray paint for the handles


There you have it a face lift on a old refrigerator
I was a little nervous about how the paint would hold up but to my surprise 
it as been AWESOME not one chip and I did this about 3 yrs ago :)

Hope this helps you guys out!!!! 

The upstairs redo

Monday, September 23, 2013

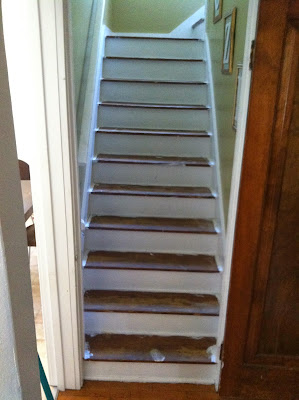
When I bought my current house about 10 years ago (wow 10 yrs.!!!) the stairs were god awful so they needed to be updated. It only to 8 years to get around to it but it did get done and I couldn't be happier with the result!


 So my Dad had the amazing idea to use 1/4 inch plywood as an overlay to the current risers that were on the stairs (I tried to remove the glue that was on them and there was no hope)......I was a lil nervous but Dad always knows but :) and it really worked out perfect. And the amount for money that I saved was hundreds of dollars. 


There was a cheap thin carpet over the stairs when we stated and I have a picture somewhere of that unfortunate design choice...so after ripping that out I painted walls, trim, base board a bright white. 


Ripping all the carpet out meant that I had to come up with something for the landing to the kids rooms and off to Lowe's I went. I picked up a saggy cream remnant for something like $60.00 not to bad. We didn't put a carpet pad down just because there isn't much traffic in this part of the house


After many coats of stain and poly we were ready to install these plywood overlays for my stairs. 


I think I had about $100 into this project and it was one of the best $100 I've ever spent.Hope you find this helpfully and if you have any questions please comment :) 


Jennifer

Free Friday

Friday, September 20, 2013

Yay!!!! It's Friday that means the Cowboy comes home today from working out of town and I have the day off fun fun!!! Did a lil shopping but more importantly pick out a crazy cute outfit to shop in :)


My jeans were an awesome find at Marshall's $10.00 I have been looking for a pair like this for awhile now. I wanted a pair of Jbrand babe jeans but the $120.00 isn't really in my budget right now. But this is the closest I have found to them and they were $10.00 can't bet that!!! My shirt is from kohl's last season. 

My hair in a sox bun which is super easy and looks oh so cute. I do have a few extensions in so maybe next time I do this hair style I will take a few pic of how I do it so you an try it yourself. 

Have a great weekend xoxoxo

A lil bit country

Thursday, September 19, 2013

It'sThursday.....here's what I picked for my day :)


And after a long day at work I had my sons favorite meal Hamburger Pie (aka Shepard's Pie) we love this meal it's easy, filling, and cost effective. 


Happy Hump Day!!!

Wednesday, September 18, 2013

Here's what I put together for today... 


Xoxoxo

Tim McGraw concert!!!

Monday, September 16, 2013

The Outlaw and I went to the Tim McGraw concert when he was in town and it was so much fun!!! Not only because he's so good looking but it was a night without the kids and it was at a fair so how much better can that get....


My outfit of course in true country girl style. Tony Lama boots and the skirt I made from an XL tank top from a thrift store. Got the chambray is from kohl's. belt was a goodwill find as well. 


My Outlaw


This is where our night ended. You can't see it very well but there's a little keychain with a gun on it that we spent way to much time and money on to get but it was well worth the time and money to have a fun date night at the fair 

XoXoXo

Summer is coming to an end :(

As the kids start school and the leaves on the trees begin to chance I thought it would be a perfect time to put together a few of my favorite summer outfits.....


Hope it gives you some ideas for the next time the warm weather hits. 


It's Friday....

Sunday, September 1, 2013

So it being the last few days of August I thought a sun dress would a great way to end summer vacation!!! 


I got this dress at Burlington Coat Factory for 10$ love the pockets and that I can wear it with boots in the fall and get that much more wear out of it!!! The sweater is old not sure were it can from. My black wedges are from target a few years ago. Belt-Goodwill :) 
 

Most Reading